Oatmeal Peanut Butter Energy Bites

I bought a box of oatmeal at Costco last week. They don’t sell oatmeal in anything smaller than 1 bazillion pound boxes. Which means I still have enough oatmeal to last me for at least another few years and through a zombie apocalypse. So, when I got tired of eating bowls of oatmeal every morning (which was only on day 3) I decided to try to make a snack  that a friend had brought to the hospital a few months ago to use up some of the massive amount of oatmeal I have.

I was super surprised that these were so easy to make and delicious! I’ll definitely be making these next year for snacking at the hospital when I don’t have time for lunch, or even when I do and I just need a 3pm pick me up! Also, they are high in fiber and low in sugar. Kind of like indulging in a cookie, but with this recipe you can at least feel better about it. I even ate them for breakfast today, see totally healthy….

Oatmeal PB Energy Bites (or OPBEB for short because doctors love acronyms)

Ingredients:

2 cups old-fashioned oats (I tried them with instant and it worked okay too)

3/4 cup fresh ground peanut butter

3/4 cup coconut flakes

1/4 cup mini-chocolate chips

1/2 cup honey (or agave)

2 Tbsp Chia seeds

1 Tbsp vanilla extract

1/2 tsp salt

  1. Stir all ingredients together in a small bowl. I added the oatmeal 1/2 cup at a time. It may seem like there’s too much oatmeal and it’ll never stir together, but just keep on stirring. I promise it’ll work.
  2. Chill in the refrigerator for 30-ish minutes.
  3. Using a spoon and your hands, pick up some of the mixture and roll into 1 inch balls.
  4. Store in the refrigerator.

MATCHED!

So catch-up time —> I matched! After all the stress of interviews, I found out in March that I matched in the specialty that I wanted (and I even got my #1 choice!!!!!). It was such a relief to know that I have a job for the next year (look out student loan repayment, I’m coming for ya). All my hard work finally paid off and I get to practice in the area of medicine I want. Whew.

Then: I graduated (from 20th grade!). I think I’ll make this my last time. You can call me Doctor now oooor maybe hold off because it sounds so weird to me still haha I’m definitely not used to that yet at all!

Now on to the fun stuff: vacations! As if I didn’t do enough traveling during interview season I planned a few trips after graduation. It’s been more of a traveling on a budget because while I have the time now, I’m still funded by whatever is left of my student loans. It’s still been a blast though! I went to California to be stereotypical tourists with friends from college and see all kinds of “tourist-y things” and ate SO MUCH good food – sushirittos, wine, pasta, seafood, wine (the Sonoma/Napa might have been my favorite…)  Good thing the weather was so nice in Cali and we walked everywhere! I even got in a few morning runs during that trip. See, balance is the key : D

After that, I jetted off to a lakehouse with med school friends for some outdoor time doing whitewater rafting, hiking, biking, and kayaking. Even though all but one of us fell out of the rafting boat (not good), we laughed about it afterwards when everyone ended up being okay. Lastly, I just finished up with a relaxing vacation with my family at the beach. I got to read tons of books (finally books for fun, not medical textbooks!), walk/run on the beach, and just enjoy my last days of freedom before residency starts.

Ok, I promise to write more often and even have a recipe to share this week as I prepare for residency starting July 1st! AH!

Life Lately

Life lately has been fun, exciting, stressful, exhausting, relaxing…. I could go on and on with every adjective in the dictionary. Interview season has been one extreme to the other. I’m pumped up with nervous anxiety at the interview, then just want to nap and veg out immediately after. I’m also having a great time! The people I’ve met on the interview trail have been amazing, both residents/faculty and applicants. I love hanging out with the people in this specialty because: 1. I think it’s a pretty cool specialty and 2. the people in it are all just pretty awesome and fun : )

When I’m not interviewing, I’m just at home with nothing to do. I used to always have to study and study and feel guilty about studying if I wasn’t studying. Now, my free time is mine. Sounds great, right? aaaaaaand it is for the most part. I’ve always been a person who would rather have 150 things to do than 1 thing, and I get so much more done when I have a bazillion things going on. I found myself getting bored really fast at first. Not anymore! I decided I was not going to waste this precious time that I always complain about never having. I’ve been reading books, catching up on my tv shows, and catching up with friends. I’ve been hiking, running, yoga-ing (probably not a word)….beating no one at trivia night, finding new tasty IPAs I love at pint night, and having board game fun with friends. With all my interviews smashed in there between! Lastly, I’ve been sleeping (I’m a needs 8-9 hr night gal) and it’s been fabulously wonderful.  Don’t make me go back to rotations tomorrow, waaah!

Hike.jpg

Hike view


Merry Christmas to all

Man oh man, I just can not believe it Christmas eve already, and halfway through my last year in med school! It seems like just last week I was complaining about the hot and humid summer and trying to stay cool while not going broke running the AC all day.

I love this time of year though. It’s been especially fun this year because as a 4th year med student I’ve had time to spend with family and friends (between traveling for interviews). It’s so nice to be able to spend a day baking with my family without having to feel like I have to run home and study all muscle attachments in the arm and then follow-up with a review of glycolysis. Those were the days….right…

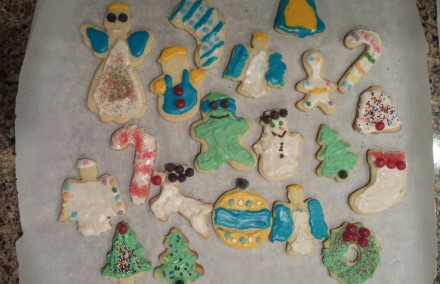
I don’t have time to post a recipe, but here’s a sneak peek of our annual cookie baking and decorating festivities at our house! (I spy a ninja turtle…..#turtlepower)

2015-12-24 12.10.55


Thankful for my Friends

I am DONE with the MICU and done with all rotations until the end of January – Horay! Next up, I get to fly all about the US like a crazy person doing interviews for residency during the next 2 months. This is the fun (?… yes, fun) part of 4th year! It will also be the first time in 3 years that I won’t feel guilty for taking time off during the holidays to study. I always did take the time off, but the “need to study” nagging guilty feeling in the back of my mind won’t be there this year.

To start this chunk of time off right, I got together with some friends for our annual *Friendsgiving* this weekend.  I brought a veggie tray (to keep us a little healthy), but I’m a sucker for dessert so I also brought a peanut butter chocolate pie (see below). I don’t think PB/chocolate is um traditional Thanksgiving food, but I promise you that after one bite of this pie you will forget all about that orange pumpkin goop. (kidding, I love pumpkin pie, but this pie is seriously really good).

After all that food, I ended my weekend with a killer 7.75 mile run. It’s been so cold here lately, and I wasn’t feeling the run at first. Luckily, I have an awesome friend who forced me out in the cold weather and it ended up being the best and longest run I’ve done in awhile! I felt great after!

Moral of this weekend: Friends are the best 🙂

What are you thankful for?

Chocolate Peanut Butter Pie (inspired by a collection of Pinterest recipes with my own added twist)

Ingredients:

Graham cracker crust: 1/2 C butter + 2 C crumbled graham crackers (OR just buy a premade crust)

1/2 C PB, softened in microwave 30 sec

1/4 C butter, softened

1/4ish C powered sugar

Instant chocolate pudding mix

Light Cool Whip

1 1/2 C Fat-free milk

PB cups, roughly chopped (as many as you want! I used ~3/4 of a 12 oz bag so 9oz)

  1. Use the back of your spoon to mash the graham cracker crust/butter mixture into a 9” pie pan (or buying your own is much easier….)
  2. In a separate bowel, mix the PB and softened butter together, adding the powdered sugar until the mixture is the consistency of brownie batter. (sorry for the imprecise sugar measurements, I literally just added the sugar until the mix was thinner than PB but seemed still spreadable) 
  3. In another bowel, Wisk or blend the milk and chocolate pudding together (can use a fork if you’re like me and don’t have a wisk or a blender). Fold in 3/4 of the tub of cool whip (reserving some for the top of the pie) & add in the chopped PB cups.
  4. Bottom layer – spread the PB/butter mix on the bottom.
  5. Next layer – the pudding/cool whip/PB cups mix.
  6. Top with the plain cool whip & decorate.

20151121_152453.jpg


Updates and stuff

I just started my MICU rotation (medicine ICU) this week. I’ve been on the medicine wards, but haven’t done any ICU rotations so I’m pretty excited to learn some new things! The past 2 days have been early morning starts (got to the hospital at 6:30AM today, yikes!) but my residents are super nice and chill and my attending likes to teach a lot. I know it’ll be a great few weeks and I’m going to learn a ton!

The latest season of Grey’s Anatomy is on Hulu and I wanted to watch some TV while I ate dinner tonight. My other favorite shows (ie. New Girl) hasn’t had any new episodes for awhile so it was either Grey’s or the news….guess what I picked?! I haven’t watched this show since my first year of medical school and since then I’ve learned a whole heck of a lot more medicine. It’s weird to watch it now. I find myself critiquing the show and picking out all the unrealistic parts of the show.

Grey’s Anatomy vs Real Life 

  1. WHERE ARE ALL THE MED STUDENTS? If this is a real academic hospital like they say with residents, then why are there ZERO med students on this show.
  2. The surgery residents always show up when the sun is bright and shining for rounds. FALSE. As a residents (even on MICU and definitely on surgery) you always round when the sun is still down, which means you pre-round basically in the middle of the night. Heeelllloooo 5AM
  3. Umm, Pediatric surgery attendings do not deliver babies. But they do on TV.
  4. Crazy awesome surgeries that would take HOURS, many many many hours, are done in time for the residents to get lunch. Since they got there to round when the sun was up, that’s a real time of uhh 3 hours?
  5. Intubating on Grey’s: “shh stop talking. We’re going to intubate you now” – no paralytics. No sedative medications. I can’t say I’ve ever intubated someone as a med student, but I still know that you usually don’t intubate a talking patient especially without meds on boards especially without paralytics! (larygospasm anyone?)
  6. The surgeons always look like they’ve showered, put on makeup, moisturizer, and got 8 hours of sleep the night before. Makeup never happens, 8 hours of sleep was a dream, and showers happened as often as possible.

Until next time yall! 🙂

Better than Qdoba?

I’ve used to work at Qdoba during college. I loved it. I got paid close to nothing, but I didn’t care. I got a free burrito, chips, queso, basically anything I wanted each shift and worked with some pretty awesome people. It was a skinny social college girl’s dream job. I joke now that there’s gotta be something in the queso that makes you crave it because I still get Qdoba cravings and will stop at nothing until I get it. However, due to being a medical student back on a student sized budget without a  job that gives me free food, I’ve been trying to make more meals at home. It’s both cheaper usually healthier than eating out.

I celebrated “Taco Tuesday” this week by making easy healthy black bean tacos! And well, I’ve continued celebrating everyday this week with leftovers because cooking after a long day at clinic just doesn’t happen sometimes. These can be made in less than 15 min on the stove with only 1 pan to clean up. They are cheaper than any restaurant and don’t require me to drive anywhere because let’s be honest – after a long day at clinic and some sort of attempt at exercise, I’m now already in my pajamas.  Dare I say that everything about these are *gasp* better than Qdoba? They might just be.

Black Bean Tacos 

Ingredients: 

2 cans black beans

1/2 onion, sliced 

1 cup frozen corn 

1/4 cup water

Juice of 1 lime

2 garlic cloves, chopped

2 Tbsp Olive oil

Cumin, cilantro, dash of red chili powder

Flour tortillas

Garden Fresh Gourmet Salsa- Jack’s Special (MY FAVORITE SALSA EVER!)

Shredded mexican cheese 

Romaine lettuce 

Sritacha sauce 

  1. Heat 2 Tbsp olive oil in large saute pan over medium heat. Once oil is hot, saute the garlic and onion until onion is transparent. Continue stirring.
  2. Add black beans, cumin, cilantro. To be honest, I didn’t measure the amounts of my spices when I made this recipe (sorry yall!). To estimate, I did “~7 shakes” of the cumin and cilantro, and a dash of chili powder.
  3. Squeeze lime juice into pan. Add frozen corn, and 1/4 cup of water. Continue stirring for ~3-5 min or until corn is hot.
  4. Assemble your tacos:  Top flour tortillas with black beans, salsa, cheese, lettuce, and sriracha
  5. Eat and be happy! 20151012_202140

First post!

Hello! I started this site with these huge lofty goals of posting recipes and all kinds of fun things throughout my 3rd year of med school. Weeeell, I’m a 4th year medical student now and just getting to writing my first post (whoops!). Third year of med school kept me busy to say the least! It was so much fun (and so much better than year 1 and 2), but I was also WAY busier.

4th year so far has been great. I finished taking my Step 2 CK (2nd written exam to be a licensed physician) and now am doing an away rotation at another school’s program. It just so happens (or maybe I planned it that way…) that one of my bestest friends from college lives there now so I am staying with her this month. We are guilty of hitting all the tourist hotspots, and also trying out some new restaurants and even doing some cooking at her apartment! So, I thought I’d mark my first post by sharing a fall recipe we made this week. It has cheese and wine in it so obviously it’s delicious. Hope you enjoy!

Spaghetti Squash Cheesy Bake 

Roasted spaghetti squash. Yum!

Roasted spaghetti squash. Yum!

Ingredients:

1 spaghetti squash (any size. The one I bought was ~4 lb)

2 garlic cloves, diced

12 oz Trader Joe’s broccoli florets (no prep work needed? yes please)

1/2 large valdalia onion, coarse chopped

3-5 oz white wine (I used a Riesling. Need enough to cover the bottom of your saute pan.)

15 oz low-fat ricotta cheese

6 oz shredded parmesan cheese

1 large egg, whisked

1 1/2 C jarred pasta sauce (I used Newman’s Own Sockarooni)

Olive oil

Spices: salt, pepper, basil, thyme, crushed red pepper flakes

  1. Stab a few holes in squash with a knife (be careful). Microwave for 3-5 minutes. This softens the outer shell of the squash and makes it easier to split open.
  2. Split the squash in half lengthwise. Take out the seeds using a spoon.
  3. Heat oven to 425 F. Drizzle olive oil over the cut surfaces. Sprinkle with salt/pepper/basil/thyme. Place squash on a cookie sheet, cut side up. Roast for 30-40 minutes until squash is tender.
  4. While the squash is cooking – heat 2 tbsp olive oil over medium in large saute pan. Once the oil is hot, add in the garlic and onions and cook until onions are transparent, ~5 min. (My non-scientific way of testing the heat of the oil:  add just a few onion/garlic pieces. If they make a nice sizzle sound, it means the oil is hot enough).
  5. Turn down the heat a little (low-medium) and add in the broccoli florets, wine, salt/pepper/seasoning. You can cover the pan with a lid and add a little more wine here, but be sure to stir often and make sure the broccoli doesn’t burn. Once broccoli is bright green and tender, take off the heat and let sit for a few minutes.
  6. Mix the ricotta cheese and egg together, then add to the veggie pan.
  7. With a fork, scrape out the strands of spaghetti squash directly into the pan with the cheese and broccoli. Add more basil/thyme and the red pepper flakes (I like heat so I add a lot!). Mix until well combined.
  8. Transfer the mixture to a 9 inch square baking dish. Top with a layer of tomato pasta sauce and a layer of parmesan cheese.
  9. Bake until the cheese is brown and bubbly, ~15-20 minutes.
Into the oven it goes! We were so hungry I  forgot to take an after pic.

Into the oven it goes!